
Quick Answer: How Do You Troubleshoot a LiftMaster Garage Door Opener?
If your LiftMaster garage door opener is not working, start by checking the power supply, remote or wall control, safety sensors, and diagnostic indicators. If the door opens but will not close, inspect the sensor area for visible obstructions and check the indicators on the sensors. If the motor runs but the door does not move, the trolley or drive mechanism may require inspection.
The exact cause depends on the opener model and the symptoms. Identify the model number before interpreting diagnostic codes or changing settings. Stop operating the door if it is crooked, unusually heavy, or has damaged springs or cables.
This guide explains how LiftMaster openers work, how to interpret different diagnostic systems, and which initial checks homeowners can safely perform before calling a garage door professional.
Common LiftMaster Garage Door Opener Problems
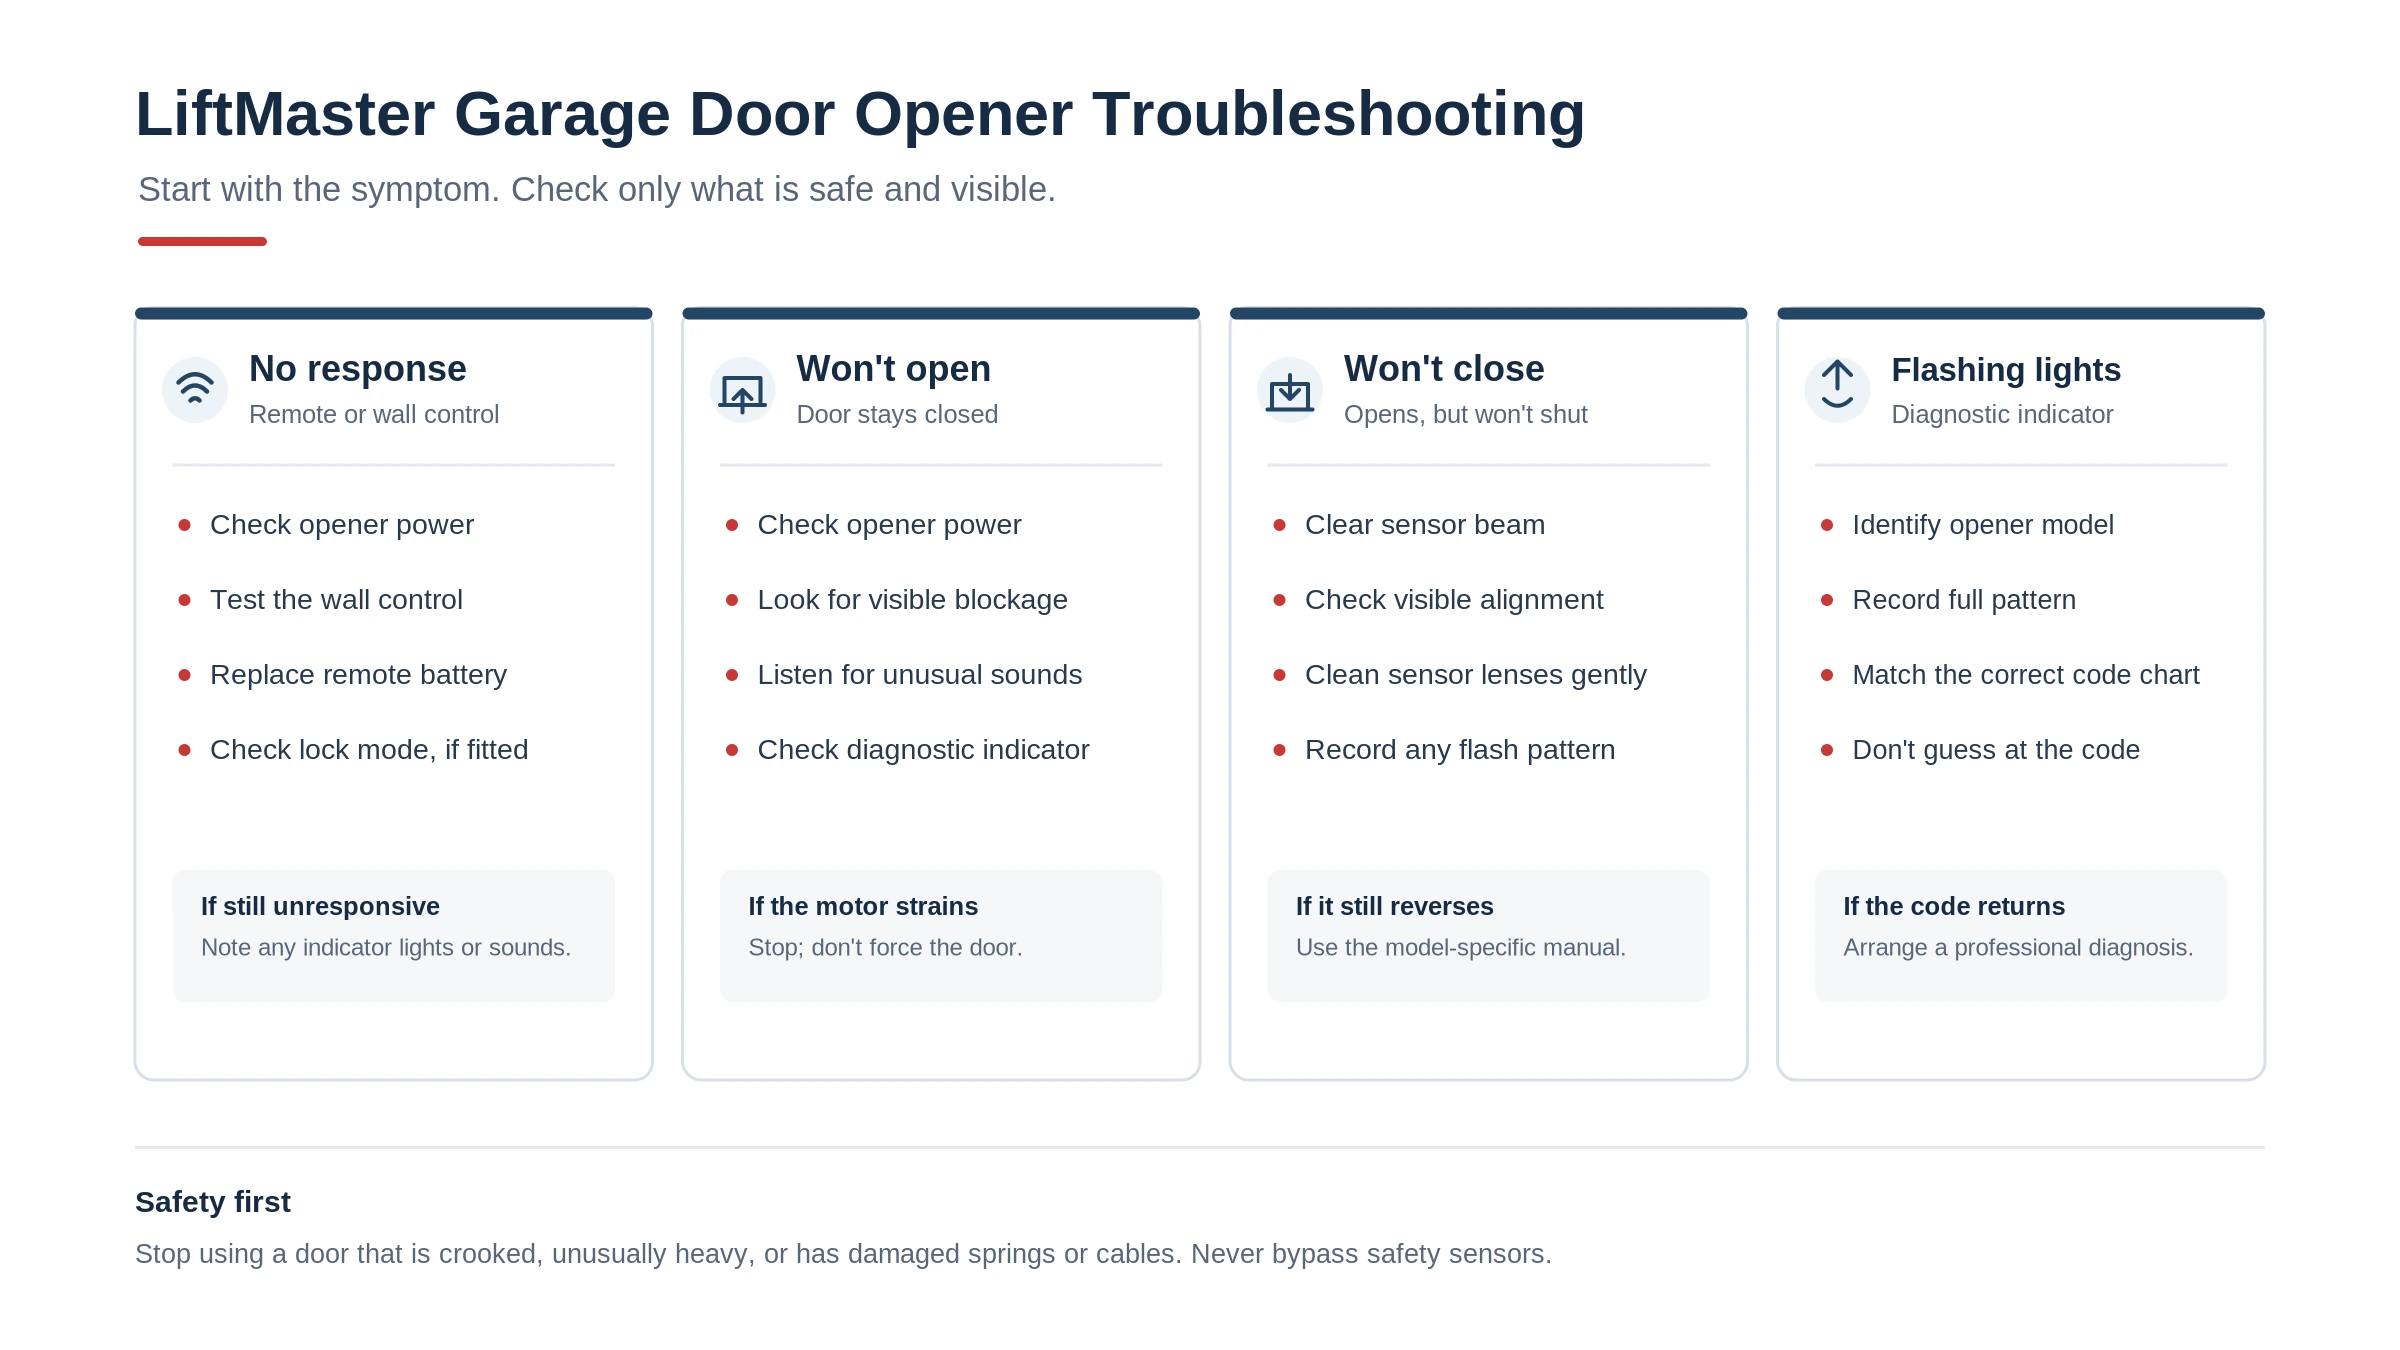
A LiftMaster opener can stop working because of a control issue, a safety system fault, mechanical resistance, or an internal component problem. The following table helps narrow down the possibilities.
| Symptom | Possible Cause | First Step |
|---|---|---|
| Opener does not respond | No power, control issue, remote problem, or internal fault | Check the power supply and observe the opener's indicators. |
| Garage door opens but will not close | Safety sensor obstruction, misalignment, wiring fault, or another closing-related issue | Check the sensor beam and visible obstructions. |
| Indicator lights flash repeatedly | Model-specific diagnostic condition | Identify the flashing indicator and count the pattern. |
| Door stops halfway | Mechanical resistance, travel setting, or movement-sensing problem | Observe the movement and check for a diagnostic indication. |
| Motor runs but door does not move | Disengaged trolley or drive-system fault | Stop repeated operation and arrange an inspection if the cause is not obvious. |
| Remote does not work | Weak battery, incompatible remote, or programming issue | Replace the battery and verify remote compatibility. |
| Door reverses unexpectedly | Obstruction, resistance, travel issue, or safety-system condition | Stop repeated cycles and consult the applicable diagnostic guide. |
These are possible explanations, not confirmed diagnoses. Different faults can produce similar symptoms.
How Does a LiftMaster Garage Door Opener Work?
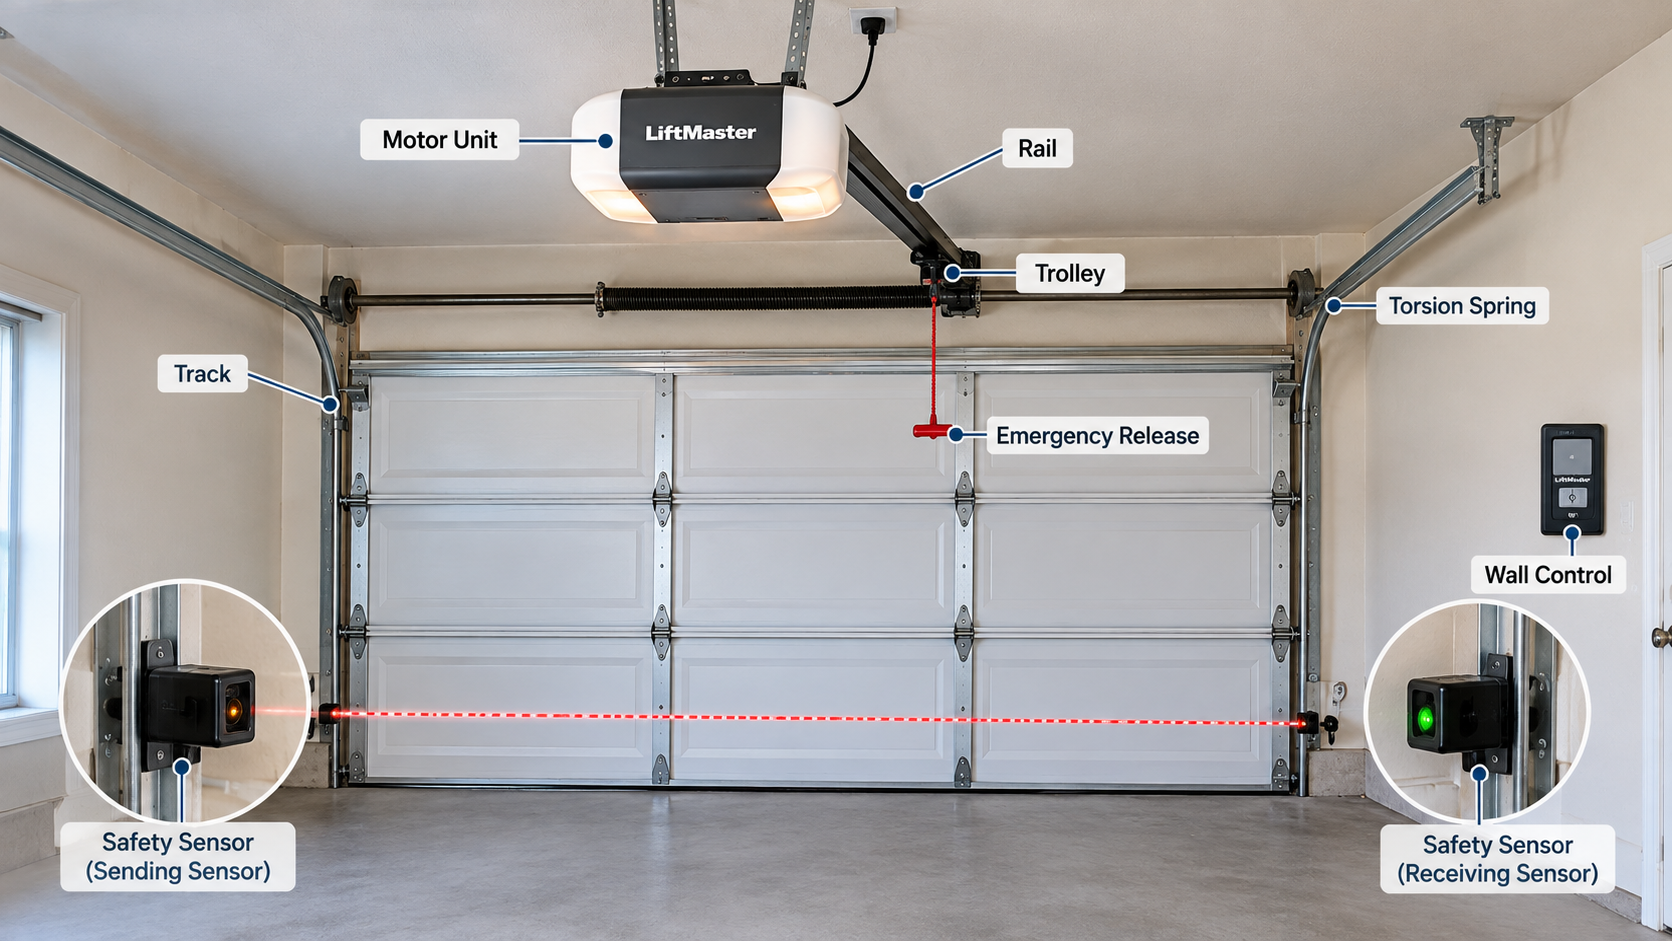
Understanding the main components helps explain why an opener may stop, reverse, or fail to respond.
A typical residential opener includes several systems:
Motor and drive mechanism: The motor drives a chain, belt, screw, or other mechanism that moves the trolley and connected door.
Control board: The control board processes operating commands and coordinates functions such as motor operation, lighting, and other model-dependent features.
Travel limits: These define the intended open and closed stopping positions.
Safety reversing sensors: These sensors create a beam across the garage door opening. On compatible systems, the opener monitors this beam to help prevent the door from closing when an obstruction is detected.
Movement feedback: Depending on the model, the opener uses motor or travel feedback to monitor movement and respond to abnormal operation.
A malfunction in one system can affect the others. For example, a door that stops during closing may have a sensor problem, mechanical resistance, an incorrectly configured travel limit, or another fault. The symptom alone does not identify the failed part.
Step-by-Step LiftMaster Garage Door Opener Troubleshooting
1. LiftMaster Garage Door Opener Is Not Working
When the opener does not respond to either the remote or wall control, begin with the power supply.
Check whether the opener is connected to its power supply.
Look for any lights, LEDs, or other signs that the unit is receiving power.
If there are no indicators, check whether the outlet is working using an appropriate, known-working device.
If the outlet has no power, check the circuit breaker and whether the outlet is controlled by a wall switch.
If the outlet works but the opener remains completely unresponsive, the unit may require further electrical diagnosis.
If the wall control works but the remote does not, concentrate on the remote battery, compatibility, and programming rather than assuming the motor has failed.
Do not open the motor housing or handle internal electrical components as a homeowner.
For further guidance, consult the manufacturer’s no-power troubleshooting information.
2. LiftMaster Garage Door Won’t Close
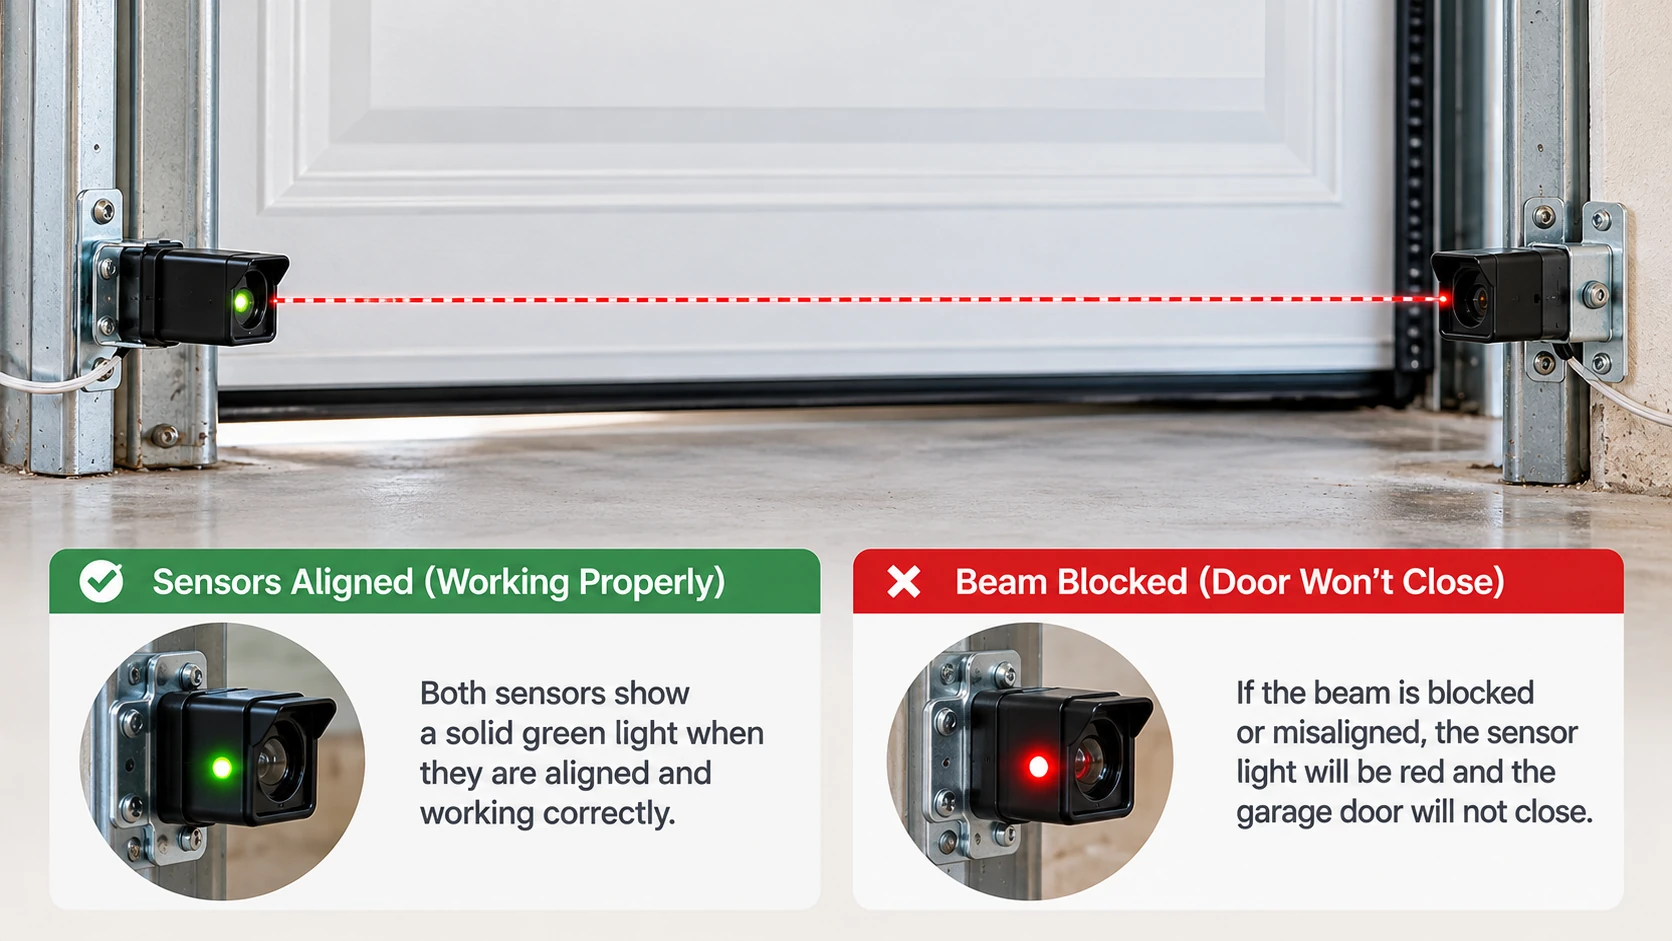
When the door opens normally but refuses to close, check the safety reversing sensors first.
These sensors are generally mounted near the bottom of the door opening, facing each other.
What homeowners can check:
Remove visible objects blocking the path between the sensors.
Check whether either sensor appears loose or visibly misaligned.
Gently clean the sensor lenses with a soft, dry cloth.
Observe whether the sensor indicators remain steady or flicker.
Check the opener’s diagnostic indicators and consult the guide for the exact model.
If the indicators remain abnormal after visible obstructions are removed, wiring or sensor failure may be involved. Persistent faults need further diagnosis.
Never bypass the safety sensors to make the door close. If the opener continues to reverse, stop repeated attempts and identify the actual cause.
See the manufacturer’s guide to garage door safety sensor alignment.
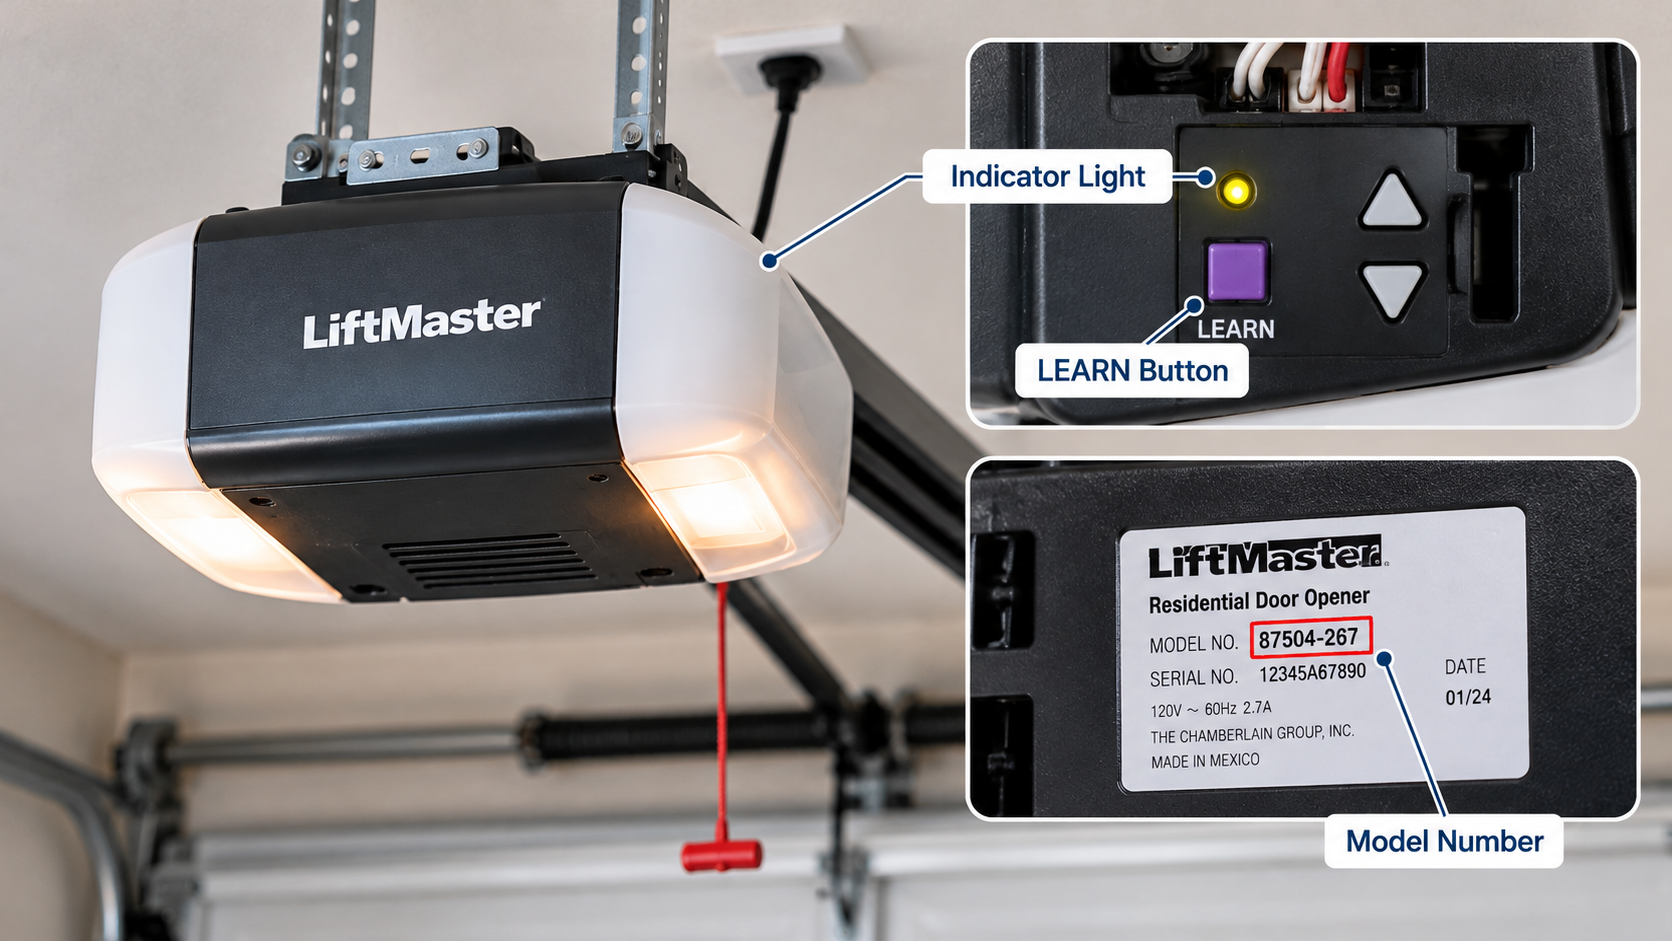
3. LiftMaster Garage Door Opener Lights Are Flashing
Flashing lights are useful diagnostic clues, but they do not have one universal meaning across all LiftMaster models.
Different systems may use:
An error code displayed in the myQ app.
UP and DOWN arrow indicators on the opener.
A flashing LED near the LEARN button.
Other indicators specific to a particular model.
How to investigate the flashing pattern:
Find the opener’s model number on its label.
Identify which indicator is flashing.
Observe and record the entire repeating pattern, including any pauses.
Determine whether you are seeing an app error code, an arrow-flash sequence, or a LEARN-button LED pattern.
Match the result to the correct manufacturer’s diagnostic chart.
Do not apply a code from one diagnostic system to another. For example, a myQ error code written as “4-6” is not automatically interchangeable with four UP flashes followed by six DOWN flashes.
The indicator pattern, system type, and opener model all matter.
Consult the official LiftMaster and Chamberlain diagnostic code guide.
4. The Garage Door Stops Halfway
If the garage door begins moving but stops before reaching its intended position, possible causes include mechanical resistance, travel settings, or movement-sensing faults.
Start with what you can observe safely.
Is there a visible object obstructing the door’s path?
Does the door move unevenly or appear crooked?
Does it stop at roughly the same point each time?
Does the opener display a diagnostic code?
Does the motor run normally, or do you hear unusual grinding or straining?
The following technical concepts help explain what may be happening.
Travel limits
Travel limits tell the opener where the door should stop when fully open or closed. Incorrect settings can cause incomplete travel or unexpected stopping.
Travel-limit procedures vary by model. Do not reprogram the limits without first consulting the correct instructions and considering whether mechanical resistance is present.
Force settings
Force-related settings affect how the opener responds to resistance while moving the door. The opener may stop or reverse if it detects unexpected resistance.
Increasing the force to compensate for a binding door is not a safe repair. Excessive force can interfere with the safety reversing system.
Movement sensing
Applicable openers use movement feedback to monitor motor operation and door travel. Depending on the model, a movement-sensing or travel-module fault can cause premature stopping or reversal.
These faults can resemble one another. A diagnostic code and inspection of the actual door movement help narrow the cause.
See the manufacturer’s guide to travel and force limit adjustments.
5. The Motor Runs but the Garage Door Does Not Move
If the motor runs but the door remains stationary, the drive system may not be transferring movement to the door.
Possible causes include:
A disengaged trolley.
A worn or damaged drive gear.
A damaged chain or belt.
A broken or disconnected drive component.
A mechanical problem affecting the garage door itself.
Do not repeatedly operate the opener if the motor makes grinding noises or the drive mechanism appears damaged.
The emergency release also requires caution. A garage door is heavy and depends on its spring system for balance. If the door is open, unusually heavy, or potentially unbalanced, releasing the opener can allow the door to fall.
Do not pull the emergency release to raise or lower a door. If the door cannot be operated safely, contact a garage door professional.
The manufacturer’s manual operation and emergency release guidance explains the associated safety precautions.
6. LiftMaster Remote or Keypad Is Not Working
If the wall control operates the opener but the remote does not, the issue may be limited to the remote or its programming.
Try these initial checks:
Replace the remote battery if necessary.
Verify that the remote is compatible with the opener.
Check whether the problem affects one remote or multiple devices.
Follow the model-specific instructions to program the remote.
If the keypad has stopped working, verify its battery, compatibility, and programming.
Avoid holding the LEARN button without checking its function. On supported models, a particular button sequence can erase previously programmed remote and keypad codes.
A memory reset is different from pairing one remote. If the opener’s memory has been erased, the affected devices may need to be programmed again.
For instructions, use the manufacturer’s guide to erasing remote controls from opener memory.
LiftMaster Diagnostic Codes Explained
LiftMaster and Chamberlain openers use more than one diagnostic system. It is important to distinguish myQ error codes, UP/DOWN arrow sequences, and flashing LED indicators.
A. myQ diagnostic error codes
The following examples apply to the manufacturer’s supported diagnostic systems.
| myQ Error Code | Manufacturer's Description | Recommended Next Step |
|---|---|---|
| 1-1 | Safety sensors obstructed, misaligned, or not connected correctly | Check for obstructions and visible sensor alignment issues. |
| 4-6 | Safety sensors obstructed or not aligned | Remove obstructions and consult the alignment guide. |
For code 1-1: The manufacturer advises checking the sensor alignment, confirming that nothing blocks the beam, and verifying the sensor connections. If the issue remains, damaged wiring or a faulty sensor may be involved.
Source: Official error code 1-1 guidance.
For code 4-6: The manufacturer identifies obstructed or misaligned safety sensors as the relevant condition on supported systems.
Source: Official error code 4-6 guidance.
These descriptions should not be treated as a universal code table for every LiftMaster opener.
B. UP and DOWN arrow diagnostics
Certain openers communicate diagnostic information using separate UP and DOWN arrow indicators.
To identify a sequence:
Count the UP arrow flashes.
Count the DOWN arrow flashes.
Wait for the pattern to repeat and confirm the count.
Record the two values separately.
Consult the diagnostic chart for the exact opener model.
For example, a supported model might communicate a sensor-related condition through four UP flashes followed by six DOWN flashes. This is an arrow-flash sequence and must not be confused with an error code displayed in the myQ app.
See the manufacturer’s guide to UP/DOWN arrow diagnostic codes.
C. Flashing LED near the LEARN button
Some older or different opener designs use an LED near the LEARN button to report diagnostic conditions.
The meaning of the pattern depends on the opener type. Record the complete sequence and look up the matching chart rather than assuming that a specific number of flashes means the same thing on every model.
The manufacturer’s diagnostic code index directs users to model-specific information for different indicator types.
Why model identification matters
The model number is generally printed on a label attached to the motor unit. The label helps identify the correct manual and diagnostic system.
Before adjusting travel settings, erasing remote memory, or interpreting a flashing pattern, confirm that the instructions match your opener.
Common LiftMaster Opener Components and Their Failure Symptoms
Understanding the role of a component can help distinguish a possible cause from a confirmed failure.
Safety reversing sensors
The photo-eye sensors face each other across the garage door opening. They help detect obstructions that could prevent safe closing.
Possible symptoms include a door that will not close normally, reverses after starting, or displays a sensor-related code. Obstruction and alignment checks are appropriate first steps. Persistent faults can involve wiring or the sensors themselves.
Logic board
The control board processes commands and coordinates the opener’s operation.
A possible board fault can cause intermittent operation, failure to respond, or unusual electrical symptoms. However, these symptoms can also result from a power supply, wiring, or control-input issue.
A technician should verify the underlying fault before replacing the board.
RPM sensor and travel feedback
On applicable models, the movement-sensing system provides feedback about motor rotation and travel. A fault may cause unexpected stopping or reversal.
These components can be internal to the opener. Homeowners should not open the motor housing to diagnose them.
Chain, belt, and trolley
The drive mechanism transfers motor movement to the door. A disengaged trolley or damaged drive component can prevent the door from moving even when the motor runs.
Grinding noises, visible damage, or abnormal operation warrant professional inspection.
Travel and force systems
Travel settings define the intended stopping points. Force settings relate to the opener’s response to resistance.
A sticking or unbalanced door can create symptoms that resemble an opener fault. Never increase the force simply to overcome resistance, and do not adjust settings without the model’s instructions.
How to Reset a LiftMaster Garage Door Opener
The word “reset” can refer to different procedures. Choosing the wrong procedure may erase settings without resolving the fault.
Power cycling
Disconnecting and reconnecting power may help with certain temporary electronic problems, but it is not a universal factory reset and will not repair a mechanical fault.
Erasing remote memory
Erasing remote memory removes programmed remotes and keypads from the opener’s memory. Those devices may need to be programmed again.
Reprogramming travel limits
Travel-limit programming determines the intended open and closed stopping positions. It is separate from erasing remote memory and must follow the procedure for the specific model.
Resetting a smart opener
Depending on the model and feature being reset, a smart-device reset may affect connected settings or paired devices. Check the official instructions before proceeding.
Before resetting: Identify the model and determine what the procedure changes. If the opener is showing a diagnostic code, record it first so that useful troubleshooting information is not lost.
For remote-memory guidance, see How to Erase a Remote from the Garage Door Opener’s Memory.
When Should You Call a Garage Door Repair Professional?
Not every opener fault is suitable for DIY repair. Arrange a professional inspection when:
The garage door is crooked, unusually heavy, or difficult to move.
A spring or cable appears damaged or disconnected.
The motor runs but the drive system does not move the door.
The opener repeatedly stops or reverses after basic checks.
Diagnostic codes persist or point to internal components.
The safety reversing system does not function correctly.
Electrical repairs, internal sensor work, or control-board diagnosis may be required.
Do not adjust high-tension springs or cables, bypass safety sensors, or increase force settings to make the door close. These actions can cause serious injury or damage.
If a fault involves the opener and the door’s mechanical system, a technician should inspect both before recommending repair or replacement.
Get Professional Garage Door Opener Repair in Huntington Beach and Orange County
Troubleshooting can help identify a likely cause, but persistent problems may require an inspection of both the opener and the garage door’s mechanical components.
Luxor Garage Door Service provides garage door opener installation, repair, and replacement services. Luxor serves homeowners in Huntington Beach and across Orange County.
If your LiftMaster opener keeps stopping, reverses unexpectedly, or does not respond to normal commands, contact Luxor to arrange an inspection.
Call (714) 475-7478 or visit the Garage Door Openers service page to get started.
You can also learn more about general garage door faults in our guide to common garage door problems and repairs.
Technical References
The following official resources support the model-specific information in this article:
Diagnostic instructions can differ across LiftMaster models. Always consult the official manual for the exact opener and seek professional assistance when a fault involves springs, cables, internal electrical components, or the safe operation of the door.
Frequently Asked Questions
Why is my LiftMaster garage door opener not working?
Possible causes include a power problem, a remote or wall-control issue, a safety sensor fault, mechanical resistance, or an internal opener problem. Start with safe external checks and use the diagnostic information for your specific model.
Why won’t my LiftMaster garage door close?
The safety reversing sensors may be obstructed or misaligned. Other possibilities include sensor wiring issues, mechanical resistance, or another model-specific fault. Check the visible sensor area and diagnostic indicators before considering further repairs.
What do flashing lights on a LiftMaster opener mean?
Flashing lights can communicate diagnostic information, but the meaning depends on the model and indicator system. Identify whether the opener uses myQ error codes, UP/DOWN arrows, or a flashing LED near the LEARN button.
Does resetting a LiftMaster opener erase remote programming?
It depends on the reset procedure. Erasing remote memory removes programmed remotes and keypads. A power cycle is a different procedure and does not automatically mean that remote memory has been erased.
Why does my LiftMaster opener stop halfway?
Possible causes include mechanical resistance, travel settings, or movement-sensing faults. Check for visible obstructions, observe the door’s movement, and record any diagnostic indication. Do not repeatedly force the door to move.
Should I repair or replace my LiftMaster garage door opener?
The right choice depends on the confirmed fault, the opener’s condition, parts availability, repair cost, and safety. A professional inspection can help determine whether repairing a component or replacing the opener is appropriate.